Step by Step – Making Nut and Seed Milks.
It’s hard to believe how easy it is to make your own nut or seed milks. It’s cost effective and great for you and the animals and the planet!

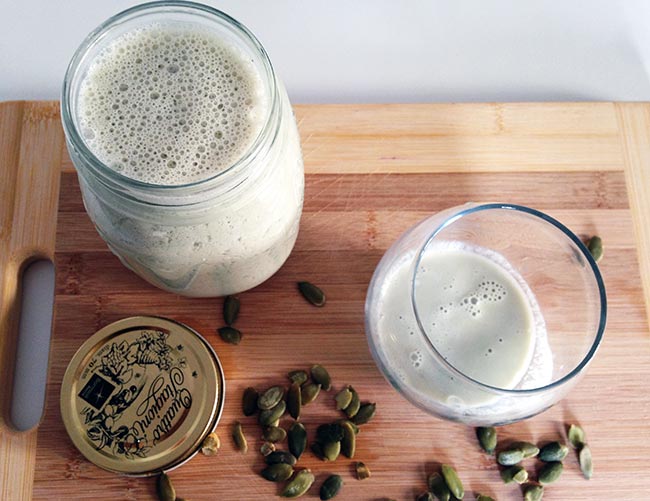
My Pumpkin Seed Milk which I love to use in baking . . .
Below are the step on how to make your own and options of flavours:
Step 1. Soak your nuts or seeds like cashews, pumpkin, sunflower, quinoa, almonds, brazil or macadamia nuts for 4-8 hours in filtered water in a large jug with the water just covering them, this step is important because it will remove any sprays if not using organic and to remove naturally forming phytic acid. Also because nuts contain numerous enzyme inhibitors that can put a real strain on the digestive system if consumed in excess and soaking helps with this. This also increases the enzyme quality of the nuts.
If your using previously activated nuts and seeds you can skip this process. Also hemp seeds don’t need to be soaked first.

Almond Milk is still my favourite . . .
Step 2. Drain off the water and add the nuts or seeds to the blender with 1 pitted date for sweetness but this is optional, if like us you use your milk for smoothies and are adding fruit you will not need to sweeten it, but if it is to drink straight add dates to get the taste you like. For 1 litre of milk 1 use 1/2 cup of nuts or seeds to 2 -1/2 cups of filters water to make more I use 1 cup of nuts or seeds to 5 cups of water (nut and seed milks freeze well in ice-cube trays ready to use)
Step 3. Blend the soaked nut or seeds and the filtered water till it’s all a pulp. I have a good blender and I still do this at least twice to make sure.
Step 4. Use a large jug or bottle with a wide neck and place your nut milk bag over the edge of the jar or bottle, pour the blended nut or seed liquid through it. Tie up the string and leave the jug or bottle with the bag in it in the fridge over night or for at least 8 hours.
Step 5. Over the sink as it can be messy, start to squeeze the bag gently as you watch your beautiful nut or seed milk drip out, this is very therapeutic. keep squeezing until all the milk has left the bag and you are left with a dry pulp in the bag.
Step 6. Seal the lid on the milk and store in the fridge for 4-5 days or as I said freeze it.

Hemp Milk frozen in cubes ready to go . . .
Step 7. Use the pulp! Either add to your raw pizza bases or crackers or add bananas and make pancakes or if you have a dehydrator then you can dry it out to use as meal at a later stage. But don’t waste it. Wash your bag out by hand and dry properly for next time.

Don’t waste that pulp . . .
Additions:
Once you get the hang of this process you can add fresh ginger, carob, cinnamon or any flavour you like. Either blending the ginger in it or using essential oils as Step 3. or when you bottle it adding the flavour then. Perfect for those kids who love chocolate milk after school (carob) . . . goodness without the guilt.
Enjoy making it your own and feel free to make combos too. . . I love pumpkin and hemp seed!


Trackbacks & Pingbacks
[…] Step by Step – Making Nut and Seed Milks. • Avoid old rancid nuts and seeds that’s any that come from a supermarket or in packets, they can be 1-3 years old—these tend to feel soft, taste cheesy with no sweetness and appear darker in color than when they are fresh. You are not getting nutrition from these just toxins and more mucus being formed. • Heated or roasted nuts and seeds are very toxic and must be avoided. Avoid roasted and salted nut and seed butters. Never cook with nuts! • Peanut butter is not recommended because: 1. In raw or heated form, it is difficult to digest due to its high protein and starch content which we know doesn’t digest well; 2. In roasted form it is highly toxic; and 3. Peanuts are one of the most heavily pesticide-sprayed crops even in Australia. • Organic, whole, raw peanuts can be eaten in moderation if they have been sprouted (soaked in water and allowed to germinate for several hours). However, these are subject to a toxic, yellow mold and must be carefully inspected and eaten with caution. Peanuts are actually a legumes and not recommend for gut healing as they are hard to digest. Choose high omega 3 nuts like walnuts, pistachios, and Brazil nuts which are great brain food, over the higher omega 6 almond if you can. Go easy on the raw nut desserts the are so hard to digest and are high in fats. Once you’ve done the healing work add them in as an occasional treat! […]
Leave a Reply
Want to join the discussion?Feel free to contribute!